2010-04-26

SU plugins Render Debate- Maxwell vs Vray vs Kerkythea

Maxwell 2.0 rendertime: 33hrs

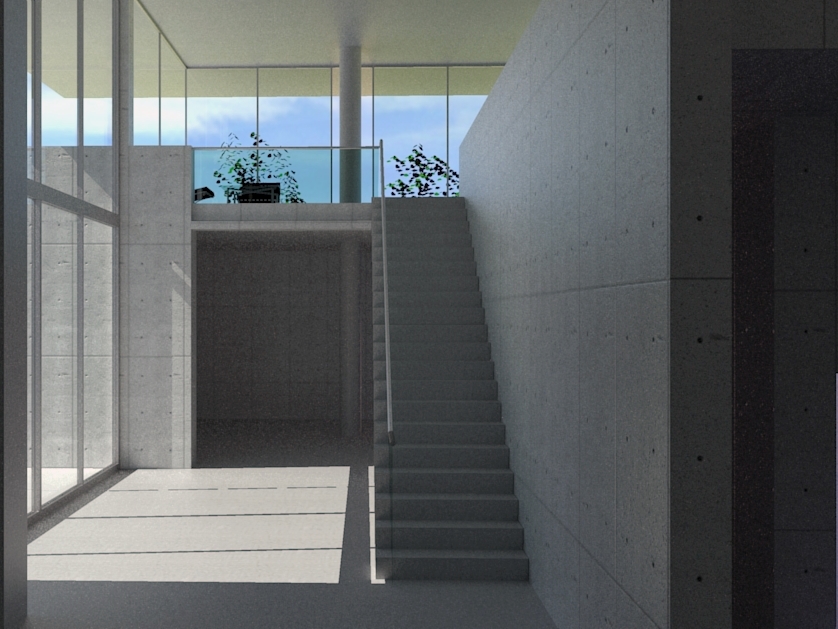
Kerkythea 2008 rendertime: 13hrs (Path Tracing)

Vray 1.6 rendertime: 5hrs (IM 5 passes+LC 5000)

This debate is all based on the render plugins for sketchup, so Max and C4D are excluded in this competition. This is not an scientific way or comparing it, as its not rendered in the same duration of time. But I try to set them as relative as possible for high quality. The material settings is the difficult one, as all these renders use different parameters. But I want to compare here is not just the quality of the output but also the workflow, flexibility, compatibility and the time of setting up the scene. I'm all new to this three programs (architecturally), so the frustration also come into account. 

Best Quality: Maxwell > Kerkythea > Vray
Best Render Speed:  Vray > Kerkythea > Maxwell
SU Compatibility: Kerkythea > Vray > Maxwell
SU Flexibility: Kerkythea> Vray >Maxwell
Interface control: Vray > Kerkythea = Maxwell
Material Settings: Maxwell >Kerkythea> Vray
One click render : Maxwell > Kerkythea > Vray

Overall: Kerkythea > Maxwell > Vray

2010-04-15

Maxwell Render


This is the result of my first testing on Maxwell Render, I remember this engine attracts my attention during my 3rd year when I was still frustrating with the Final Render which is now already intergrated in Maya. At the time I begin to use a bit of Vray and give up testing it out. The first impression is the interface looks rather complicated and doesn't makes you comfortable for first use. A lot of sub windows and technical caption flying around the settings menu. But actually it only took me like 1 or 2 hr to get familiar with it. The only complicated part is the material settings which is based on layers, blending and weight settings. The rest is straight forward. Set the location of the sun and the time and it does the rest of the job. Although there's more advance settings like turbulance, Ozone...etc. But you can ignore all these and just go for the default. The biggest problem I had is the viewport interface, its completely different than Max, Rhino, Sketchup which is confusing me. Another is the texture UV coordination which is not so intelligent, I really appreciate the Gizmo in 3dmax, simply pulling the axis to arrange the bitmap in viewport. But the really cool thing for the new Maxwell 2.0 is the multi light adjustment, with this you can trun on and off any scene lights(even the colors) anytime while render of after render, which none of the render engine can manage this, its because of using physical light parameters. Basically all u need to do is set the material and just hit render, no need to check light intensity, just adjust it afterwards. Another point of Maxwell is that it doesn't have any light object like spot or omni, and I haven;t figure out how to control the light quality by just using emmisive material, but it supports IES files which makes it even easier for the right light distribution. All above advantages still leads to his big disadvantage, the render speed. This image with SL19 (Maxwell unique passes factor) takes 16 hr and still have a lot of noise needs to be reduced.This especially happens in interior scene where all lights are indirect, not to mention this Tadao Ando's spiritual light. I have a quick check on Maxwell forum, some really decent images comes to 30hrs or more running on a 8 core 3.0Ghz server. So maybe my poor duo core  2.4Ghz for 16hr is nothing. The frustrating thing is that by searching on the forum, I found someone testing it on the same scene with nice material mapping which immediately beat my crappy image. 

2010-04-13

Vray - IM+LC with IES lights


This should be my last test on Vray, using the best solution of interior scene, IM+LC. this time instead of using fixed sampling I uses adaptive sampling which gives faster result and sharper edges as well. The IES lights gives more realistic feeling but it doesn't support the emissive material mapping for IES files, which means u need to set up a vray light underneath an emitting object which I found its a bit complicated. Maxwell and Kerkythea both support IES mapping, so its easier to just apply it as a material on the lamp fittings. This saves a lot of time to set up when exporting models from Sketchup. Anyway, nothing is perfect. Vray best advantage is the speed and quality. Kerkythea is easy and fully support with Sketchup. Maxwell is physically accurate but really slow. C4D is very fast but doesn't have IES light. From the following test, as for sketchup user, I think Kerkythea is the easiest solution and its free especially for everyday use. Vray will recommend for the final production or for animation output.     

2010-04-11

Vray-Progressive Path Tracing


Another rendering method that can use in Vray is called Progressive Path Tracing, it is using the light cache as calculation, each passes calculate the whole frame, so the rendering can be stopped anytime you want. Similar to Kerkythea MTL and Maxwell, the images is going better when more passes are calculated. As an result, the speed is always the problem if u want a clear image.  I know the advantages of this is the simple settings, no need to tweak the parameters like Irradiance Map does to get the right light distribution. Maybe its not a good exmaple to test the interior view with this method, but I haven't really found out the real value of using it. I think the IM+LC works much better and faster.

2010-03-31

Cinema 4D - Irradiance Map


With Jaime's suggestion of testing the GI in Cinema 4d, its another possibility that might be a possible workflow Sketch up user, or an alternative Mac's render engine. The export of 3ds work well in C4D, it keeps the camera view ( field of view is a slightly difference from SU, but the angel is correct) and the material map and UV coordinate. which means its easy to export it from SU. And it supports sun light system as well which gives a fast and accurate light setting for building renders. The good impression for me like a non C4D user is that the setting is simple, the render method is not as complex as Vray, there's two main options, one is Irradiance map and one is Irradiance Map + QMC, it is the same biased method like Vray. All u have to do is to determine the quality of the sampling which saves a lot of time tweaking the parameters. Another good effect that C4D has is the ambient occlusion, it gives certain detail of soft shadow that will enhance the edges. The easy settings of material is another advantages, works similar as 3dMax, the material property index, u can simply tick the box and give the amount of the effect, such as transparency and reflection. And it also has the layer property like Maxwell material. So a glossy wooden floor will be diffuse + multiplied layer refection. The speed/quality of rendering for a new user is very convincing, u don't feel frustrated like using Vray (if u miss some settings the quality is entire different) the following images take 5hrs with 2 GI passes (IR method) The only disadvantages is that it doesn;t support IES lighting, there's plugin that can do the job but not with default shader.  On material view, the glossiness of the reflection doesn't work properly as I expected, its a bit flat if u see the wooden table. But the bump and sharpness work really well. To sum up, I believe c4D is a good balance between easy settings and render speed.

2010-03-30

Vray - Irradiance Map + Light Cache


Finally I got this right, for interiors its better to use Light Cache instead of DMC, its less noisy and faster. And the intensity of the material shouldn't be too high, before I set it as 15 and thats why it makes so many black shadows. This time reduce it to 2.5 and lower the noise threshold, the render speed improve so much and also the quality as well. This one only took like 4hrs and with quite a nice quality already. The wood of the table doesn't look nice yet, but its just matter of tweaking it. In this case, Vray has a big advantages in render speed comparing to Kerkythea in Interior models. This is due to the irradiance map and the light cache method that Kerkythea don't have. 

2010-03-27

Vray - Irradiance Map + DMC with Adaptive AA


This week I've being testing the vray plugin for Sketchup to test out the performance and the workflow, the good thing about the plugin is that its intergrated, there's no export and import problem. it directs renders from your Sketchup windows, and the material can be set by picking up the material names, this is very useful that it minimize the time of material settings. Compare to Kerkythea its more of less the same, the only difference is that Kerkythea needs to export the model and will lose the face-me object, and if u change the model u need to re-export it. So if this case, the Vray can used as a default render for daily use with better quality GI output. But...the speed is always the concern. in this case I prefer not to use too many advance material, just glass and matte material, something  flat cartoon like rendering will be really fast.

Again, using the same model and difficult indirect light condition to test out the speed and performance of interior scene which is always the hardcore for GI. In this model I didn't use any rectangle light to fake the sun light ( It will have better quality I guess, u get to setup subdivision of the light emitter) instead, I want to use the SU sun settings to simulate the actual shadow. After 10hr rendering, with 5 passes of Irradiance map + 16 subdivision DMC + Adaptive AA sampling,  the result come up a bit blurry and with common problem of Irradiance map, the black dot. During the testing, I use DMC + 5000 Light Cache, and fixed AA, still come up the same blurry image which is very irritating. I'm not such a vray expert so if u know where is the key settings I need to improve please drop me a message. Here are the settings.


2010-03-17

Kerkthea MTL + Depth Map

Original Output

After the deadline of the BFI competition project, I got a little to play around with this free render engine, the MTL algorithm is a more accurate one compare to photon mapping, especially in the details and edges. The best well know software that use MTL is Maxwell, and it ends up with easy settings and accurate light calculation. The biggest problem with MTL is the slow render speed and the grain, it needs more passes for each frame to get better result. But an advantage is that u can stop whenever u want and save the image. I use Tadao Ando's the church of light as a model, because its a simple geometry with simple light fittings, it will be the best condition to test the software, especially on the indirect sun light. After 20hr of render which I think its too much for everyday use, but the result end up quite satisfying. the indirect light do illuminate the interior and u get the fadeout effect on the floor of light reflections. Another very useful settings is the depth map, and it takes only seconds to get this depth of field mask that can apply to the original image in Photoshop very easily. There's no need of using DOF camera that take ages to render. I'm sure other program like Vray or Mental Ray can easily achieve this result and maybe better, but a software for free and with easy settings, it really done a good job.  

Depth Map
Final Result in Photoshop